Maven 사용자를 위한 Gradle 의 간단 사용법
gradle이라는 것을 알았을 때 일단 한숨이 나왔다. 이제 겨우 maven에 적응되었는데 또 다른 툴이라니 오마이갓! 그런데 권남님의 블로그에서 <maven을 넘어 gradle로 가자> 라는 글을 읽고 공감되었다.
무엇보다도 새로운 툴이 나왔다면 개발자라면 응당 호기심을 갖고 해봐야지 않은가! 일단, 여기서 gradle에 대한 개념을 설명하진 않겠다(위에 권남님 블로그를 참조할 것) 여기서는 gradle에 대해 알고, 간단한 헬로버전을 적용해보는 것으로 하겠다. 본 문서는 https://spring.io/guides/gs/gradle/ 의 영문내용을 100% 참조했다.
일단, gradle를 깔아야지.. 맥이든, 리눅스이든, 윈도우든 설치방법은 압축푸는 방식이다. 본 글은 우분투기반으로 설명한다. <Gradle>에서 다운로드 받고 적당한 곳에 압축을 풀고, 그리고 환경변수에 등록해준다.
export GRADLE = /home/ykkim/gradle-2.2.1
export PATH = $PATH:$GRADLE/bin
맥에서 brew를 쓴다면 brew install gradle 하면 간단히 최신버전이 설치된다.
설치후에 콘솔에서 아무나 gradle -v 라고 치면 버전명이 나오면 잘 된 것이다. maven설치와 같다.
일단 이클립스에서 생성하는 방법보단 gradle의 특징을 알기 위해선 콘솔에서 그냥 만드는 방법으로 시작한다. 그리고 나서 이클립스에 불러오는 방법을 설명한다. 먼저 콘솔로 가서 프로젝트를 만들자. 이클립스에서 불러올테니 그냥 workspace안에 만들자.
workspace> mkdir helloGradle
workspace> cd helloGradle
workspace> mkdir -p src/main/java/hello
다음 아래 소스를 만들자. vi편집기등을 이용해서…
/**
 * Greeter class
 * */
package hello;

public class Greeter {
 public void sayHello() {
  System.out.println("Hello Gradle.");
 }
}

/**
 * HelloGradle class
 * */
package hello;

public class HelloGradle {
 public static void main(String[] args) {
  Greeter greeter = new Greeter();
  greeter.sayHello();
 }
}
콘솔에서 cd helloGradle로 이동하자. 그리고 나서 gradle이라고 명령어를 치자.
helloGradle>gradle
-----------------------------------------------------------------------------------------------------------
Welcome to Gradle 2.2.1.
To run a build, run gradle <task> ...
To see a list of available tasks, run gradle tasks
To see a list of command-line options, run gradle --help
BUILD SUCCESSFUL
Total time: 11.23 secs
-----------------------------------------------------------------------------------------------------------
위에 처럼 뭔가 기분 좋은 BUILD SUCCESSFUL 이 수행된다.
ls -a 를 치면 .gradle 이라는 디렉토리가 생성됨을 알 수 있다.
콘솔에서 다시 helloGradle>gradle tasks 를 쳐본다.
------------------------------------------------------------------------------------------------------------
:tasks
------------------------------------------------------------
All tasks runnable from root project
------------------------------------------------------------
Build Setup tasks
-----------------
init - Initializes a new Gradle build. [incubating]
wrapper - Generates Gradle wrapper files. [incubating]

Help tasks
----------
components - Displays the components produced by root project 'helloGradle'. [incubating]
dependencies - Displays all dependencies declared in root project 'helloGradle'.
dependencyInsight - Displays the insight into a specific dependency in root project 'helloGradle'.
help - Displays a help message.
projects - Displays the sub-projects of root project 'helloGradle'.
properties - Displays the properties of root project 'helloGradle'.
tasks - Displays the tasks runnable from root project 'helloGradle'.

To see all tasks and more detail, run with --all.

BUILD SUCCESSFUL

Total time: 12.71 secs
--------------------------------------------------------------------------------------------------------------
gralde tasks를 보면 현재 gradle에서 수행할 수 있는 작업내역들이 나온다. 여기에 우리는 java 플러그인을 추가할 것이다.
이제 build.gradle 라는 파일을 만들고 파일안에 다음과 같이 한 라인을 적고 저장하다.
apply plugin: ‘java’
그리도 나서 다시 gradle tasks를 쳐보자.
-----------------------------------------------------------------------------------------------------------
:tasks
------------------------------------------------------------
All tasks runnable from root project
------------------------------------------------------------

Build tasks
-----------
assemble - Assembles the outputs of this project.
build - Assembles and tests this project.
buildDependents - Assembles and tests this project and all projects that depend on it.
buildNeeded - Assembles and tests this project and all projects it depends on.
classes - Assembles classes 'main'.
clean - Deletes the build directory.
jar - Assembles a jar archive containing the main classes.
testClasses - Assembles classes 'test'.

Build Setup tasks
-----------------
init - Initializes a new Gradle build. [incubating]
wrapper - Generates Gradle wrapper files. [incubating]

Documentation tasks
-------------------
javadoc - Generates Javadoc API documentation for the main source code.

Help tasks
----------
components - Displays the components produced by root project 'helloGradle'. [incubating]
dependencies - Displays all dependencies declared in root project 'helloGradle'.
dependencyInsight - Displays the insight into a specific dependency in root project 'helloGradle'.
help - Displays a help message.
projects - Displays the sub-projects of root project 'helloGradle'.
properties - Displays the properties of root project 'helloGradle'.
tasks - Displays the tasks runnable from root project 'helloGradle'.

Verification tasks
------------------
check - Runs all checks.
test - Runs the unit tests.

Rules
-----
Pattern: clean<TaskName>: Cleans the output files of a task.
Pattern: build<ConfigurationName>: Assembles the artifacts of a configuration.
Pattern: upload<ConfigurationName>: Assembles and uploads the artifacts belonging to a configuration.

To see all tasks and more detail, run with --all.

BUILD SUCCESSFUL

Total time: 15.387 secs
-----------------------------------------------------------------------------------------------------------
아까보다 훨씬 많은 tasks가 추가되어있다. Build tasks에 보면 Java관련 기능등이 추가됨을 알 수 있다.
이제 콘솔에서 다시 gradle build 라고 치자.
--------------------------------------------------------------------------------------------------------------
:compileJava UP-TO-DATE
:processResources UP-TO-DATE
:classes UP-TO-DATE
:jar
:assemble
:compileTestJava UP-TO-DATE
:processTestResources UP-TO-DATE
:testClasses UP-TO-DATE
:test UP-TO-DATE
:check UP-TO-DATE
:build

BUILD SUCCESSFUL
----------------------------------------------------------------------------------------------------------------
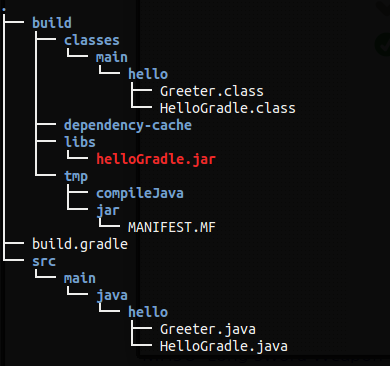
무언가 컴파일이 되었다.helloGradle 디렉토리 구조를 확인해봐자. build라는 폴더가 생성되고 그안에 libs라는 폴더가 있고
helloGradle.jar 파일이 생성 된것이 보인다.
gradle로 빌드가 잘 된 것이다. 그러면 maven처럼 라이브러리를 추가하는 법을 알아보자.
먼저 소스를 수정한다. (HelloGradle.java) LocalTime 부분이 추가되었다.
package hello;

import org.joda.time.LocalTime;

public class HelloGradle {
 public static void main(String[] args) {
  Greeter greeter = new Greeter();
  greeter.sayHello();

  LocalTime currentTime = new LocalTime();
  System.out.println("The current local time is: " + currentTime);
 }
}
수정후 gradle build 를 콘솔에서 치자.
----------------------------------------------------------------------------------------------
:compileJava
/home/ykkim/workspace/helloGradle/src/main/java/hello/HelloGradle.java:3: error: package org.joda.time does not exist
import org.joda.time.LocalTime;
                    ^
/home/ykkim/workspace/helloGradle/src/main/java/hello/HelloGradle.java:9: error: cannot find symbol
  LocalTime currentTime = new LocalTime();
  ^
  symbol:   class LocalTime
  location: class HelloGradle
/home/ykkim/workspace/helloGradle/src/main/java/hello/HelloGradle.java:9: error: cannot find symbol
  LocalTime currentTime = new LocalTime();
                             ^
  symbol:   class LocalTime
  location: class HelloGradle
3 errors
:compileJava FAILED

FAILURE: Build failed with an exception.

* What went wrong:
Execution failed for task ':compileJava'.
> Compilation failed; see the compiler error output for details.

* Try:
Run with --stacktrace option to get the stack trace. Run with --info or --debug option to get more log output.

BUILD FAILED

Total time: 3.409 secs
----------------------------------------------------------------------------------------------
뭐, 당연히 에러가 날 것이다. LocalTime이라는 라이브러리가 없기 때문이다. 메이븐에서는 pom.xml에서 dependency로 추가했다. gradle에서는 아까 생성한 build.gradle 파일을 열고 추가하면 된다.
repositories {
 mavenCentral()
}
재미있는 것은 repositories 에 maven저장소를 이용한다는 것이다. 즉, Maven Central repository 에서 라이브러리를 가져올 수 있다.
dependencies 에서 우리가 가져올 라이브러리를 기재한다.
메이븐저장소에서 검색하면 gradle 내용이 보인다. (http://mvnrepository.com/artifact/joda-time/joda-time/2.2)
메이븐이라면 <dependency> 를 추가하지만,
<dependency>
 <groupId>joda-time</groupId>
 <artifactId>joda-time</artifactId>
 <version>2.2</version>
</dependency>
gradle에서는 아래 처럼 추가한다. 이후에 compile “추가할 라이브러리” 로 추가하면 간단하다.
dependencies {
 compile "joda-time:joda-time:2.2"
}
저장하고 다시 빌드를 해보자
gradle build
BUILD SUCCESSFUL 나오면서 컴파일이 잘 된 것이다.
그런데 우리가 받은 라이브러리는 어디에 있는 것일까? maven에는 홈디렉토리의 .m2/respository 에 있어서 거기서 참조하는데 gradle은 어디에 두는 것일까?
그런데 이것조차 메이븐과 구조와 같다. 홈디렉토리에 보면 .gradle 이라는 숨김 폴더가 있다.
즉 .gradle > caches > module-2 > files-2.1 에 보면 joda-time 이라는 라이브러리가 보인다.
구성방식이 거의 메이븐과 같다. 다만 pom.xml 대신 위에 build.gradle를 이용함으로써 좀더 편리하게 사용할 수 있다.
이제 우리가 만든 helloGradle를 이클립스에서 불러오도록 하자. 먼저. build.gradle 에서 eclipse 플러그인을 추가하고 저장하다.
apply plugin ‘eclipse’
다음에 이클립스에서 gradle 플러그인이 설치되어있어야 한다. Eclipse Marketplace에서 gradle를 검색한후에
Gradle Integration for Eclipse(4.4) 3.6.3 RELEASE를 받는다. (이클립스 루나 4.4일 경우)
그리고 나서 file > import에 보면 아래와 같이 보여야 한다. 만약 안보이면 Gradle를 재설치해야 한다.

Gradle Project를 선택하고 Next를 선택하자
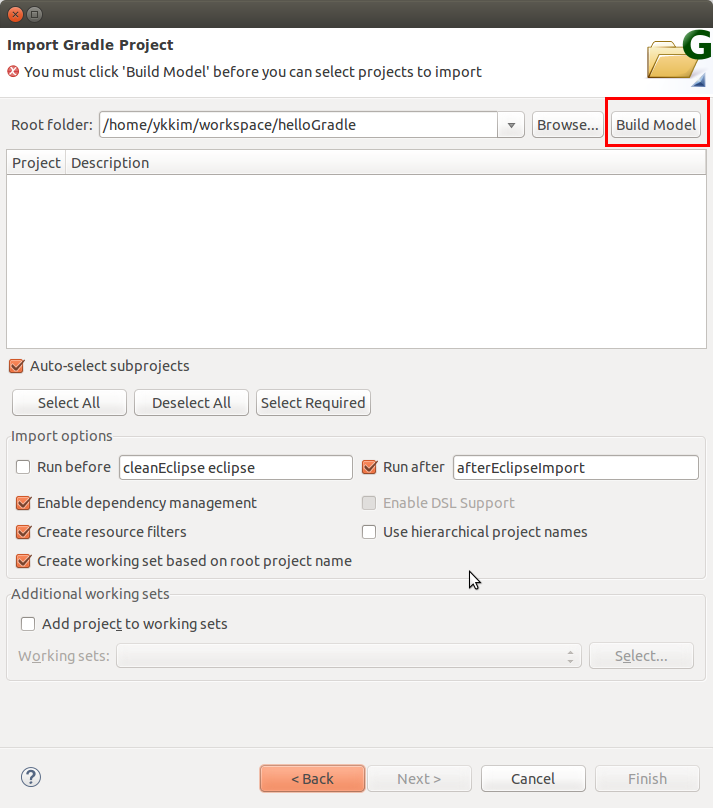
그러면 Build Model를 클릭하라고 나온다. Build Model를 클릭하면 eclipse에 맞게 임포트가 된다.
시키는대로 고분고분 따르자.. 그런 다음 Finish를 누르면 아래처럼 나온다.
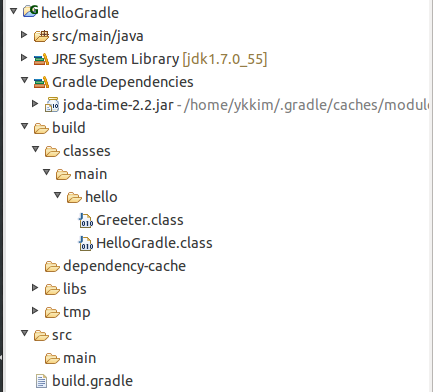
Gradle Dependencies에 보면 우리가 받은 라이브러리가 보인다. 메이븐과 거의 흡사하다.
물론 추후에는 이클립스 Gradle 플러그인을 이용해서 Gradle프로젝트를 생성하면 된다.
New Project > Gradle > Gradle Project 로 하면 기본적인 디렉토리구조와 build.gradle이 생성된다.