Spring REST API 문서를 Swagger로 만들자
REST API를 개발할때 관련 문서를 만드는 것은 꽤 귀찮은 일이다. 파라미터가 변경되거나 주소가 변경되면 실제 문서와 소스와 싱크가 맞지 않으면 아무리 문서를 잘 만들어도 소용이 없다. 변경된 소스를 그대로 문서로 만들어 주는 것이 없을까? 그런 고민을 해결해주는 것이 바로 Swagger 이다.
Swagger는 RESTfull API 문서를 만들어주는 프레임워크이다. NodeJS, Java, Python등 다양한 언어를 지원해준다. 우리는 여기서 Spring 에 적용해보도록 하겠다.
1. 설치
기본 베이스는 이렇다. Spring MVC, Security, AOP, Gradle등을 적용한 rest-api 프레임워크가 존재하고 있다면, 그안에서 Swagger를 설치해보자. Spring설정은 Java config 기반으로 설명한다.
Maven를 쓴다면 라이브러리를 추가하자
<!-- Swagger -->
<dependency>
	<groupId>io.springfox</groupId>
	<artifactId>springfox-swagger2</artifactId>
	<version>2.6.1</version>
</dependency>

<dependency>
	<groupId>io.springfox</groupId>
	<artifactId>springfox-swagger-ui</artifactId>
	<version>2.6.1</version>
</dependency>
Gradle를 쓴다면 다음과 같을 것이다.
compile 'io.springfox:springfox-swagger2:2.6.1'
compile 'io.springfox:springfox-swagger-ui:2.6.1'
적당한 곳에 Swagger Config 파일을 만든다.
@Configuration
@EnableSwagger2
public class SwaggerConfig {

    @Bean
    public Docket api() {
        return new Docket(DocumentationType.SWAGGER_2)
                .select()
                .apis(RequestHandlerSelectors.basePackage("example.api.control"))
                .paths(PathSelectors.any())
                .build();

    }
}
apis(RequestHandlerSelectors.basePackage)에 Swagger를 적용한 패키지를 작성할 수 있다. 여기서는 api.control 패키지안에 api 관련 controller를 넣고 관리하도록 한다. 물론 옵션에 따라 다르게 줄수도 있다.
스프링 시큐어리티가 적용되어 있다면 api호출은 시큐어리티에 적용되면 안되므로 별도로 제외처리해준다. 스프링 시큐어리티가 적용안되어 있다면 무시해도 된다(하지만 허가된 사람만 문서를 볼수있게 하는 인증은 반드시 필요하다고 본다)
@Configuration
@EnableWebSecurity
@EnableGlobalMethodSecurity(prePostEnabled = true)
@ComponentScan("example")
public class SecurityConfig extends WebSecurityConfigurerAdapter {
//..... 중략.......//
  @Override
  public void configure(WebSecurity web) throws Exception {
      //spring security 제외 경로설정
      web.ignoring().antMatchers("/resources/**").antMatchers("/api/**")
  }
 //..... 중략.......//
}
configure(WebSecurity web) 의 antMatchers에 api로 시작되는 경로는 시큐어리티에 적용되지 않게 한다.
다음은 WebMvcConfigurerAdapter를 상속받은 클래스에서 리소스에서 Swagger UI를 등록해준다. Swagger UI는 rest api문서를 만들어주는 UI 도구라 보면 된다.
@Configuration
@EnableWebMvc
@EnableAspectJAutoProxy
@ComponentScan("example")
public class WebConfig extends WebMvcConfigurerAdapter {
  //---중략---/

  //static 리소스 처리
    @Override
    public void addResourceHandlers(ResourceHandlerRegistry registry) {
        registry.addResourceHandler("/resources/**")
                .addResourceLocations("/WEB-INF/resources/");

        registry.addResourceHandler("swagger-ui.html")
                .addResourceLocations("classpath:/META-INF/resources/");

        registry.addResourceHandler("/webjars/**")
                .addResourceLocations("classpath:/META-INF/resources/webjars/");

    }
}
기존의 resources를 처리한 부분에 추가해주면 된다. 역시 시큐어리티를 사용한다면 로그인 한 다음에 성공 URL를 변경해주면 바로 로그인 성공후 Swagger UI 페이지로 넘어가게 할 수 있다. 이부분도 역시 필수는 아니다. 별도의 경로를 만들어도 된다.
/**
 * 로그인 성공 후에 처리 클래스
 * Created by yookeun on 2017. 2. 25..
 */
@Component
public class LoginSuccessHandler implements AuthenticationSuccessHandler {
    @Override
    public void onAuthenticationSuccess(HttpServletRequest request, HttpServletResponse response,
                                        Authentication authentication) throws IOException, 											 ServletException {

        response.setStatus(HttpServletResponse.SC_OK);
        response.sendRedirect("swagger-ui.html");
    }
}
시큐어리티에서 성광하면 바로 swagger-ui.html로 이동한다. 이것으로 모든 설정은 끝났다. 아주 간단하다.
2. 구현
여기서는 게시판을 적용한 api를 예제로 들겠다. boardController 클래스는 아래처럼 구성되어 있다.
@RestController
@RequestMapping("/api")
public class BoardController {

    @Autowired
    private BoardService boardService;

    @RequestMapping(value = "/board", method = RequestMethod.GET)
    public ResultJson selectListBoard() {
        ResultJson resultJson = new ResultJson();
        List<BoardDto> list = boardService.selectListBoard();
        resultJson.setItems(list);
        resultJson.setTotal(list.size());
        resultJson.setResultCode(ResultCodeType.SUCCESS.getCode());
        resultJson.setMsg(ResultCodeType.SUCCESS.getMsg());
        return resultJson;
    }

    @RequestMapping(value = "/board/{id}", method = RequestMethod.GET)
    public ResultJson selectOneBoard(@PathVariable("id") Integer id) {
        ResultJson resultJson = new ResultJson();
        resultJson.setObject(boardService.selectOneBoard(id));
        resultJson.setResultCode(ResultCodeType.SUCCESS.getCode());
        resultJson.setMsg(ResultCodeType.SUCCESS.getMsg());
        return resultJson;
    }

    @RequestMapping(value = "/board", method = RequestMethod.POST)
    public ResultJson insertBoard(
            @RequestParam(value = "title", required = true) String title,
            @RequestParam(value = "content", required = true) String content){

        ResultJson resultJson = new ResultJson();
        BoardDto boardDto = new BoardDto();
        boardDto.setTitle(title);
        boardDto.setContent(content);
        boardService.insertBoard(boardDto);

        resultJson.setResultCode(ResultCodeType.SUCCESS.getCode());
        resultJson.setMsg(ResultCodeType.SUCCESS.getMsg());
        return resultJson;
    }
}
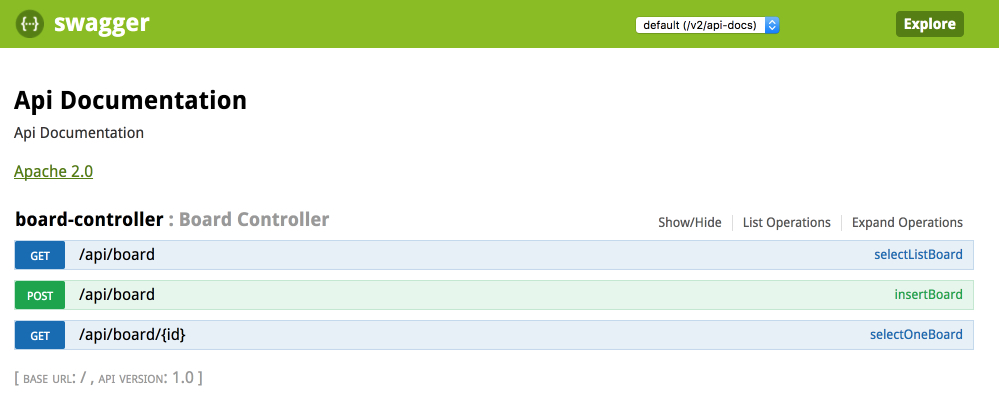
간단하게 전체를 조회하는 GET : /api/board 그리고 특정 게시판을 읽을 수 있는 GET: /api/board/{id}, 마지막으로 게시판에 글을 쓰는 POST : /api/board 로 구성되어 있다. 이 상태에서 스프링을 재가동하면 Swagger-ui가 적용된 화면이 나온다. 여기서 ResultJson는 그냥 json형태로 넘겨주기 위해 만든 클래스이다. 용도에 맞게 알아서 만들면 된다.
스프링을 재가동하고 로그인하면 다음과 같은 이쁜 화면이 보인다.
post 메소드를 클릭하면 아주 멋지게 파라미터들과 사용법이 나온다..
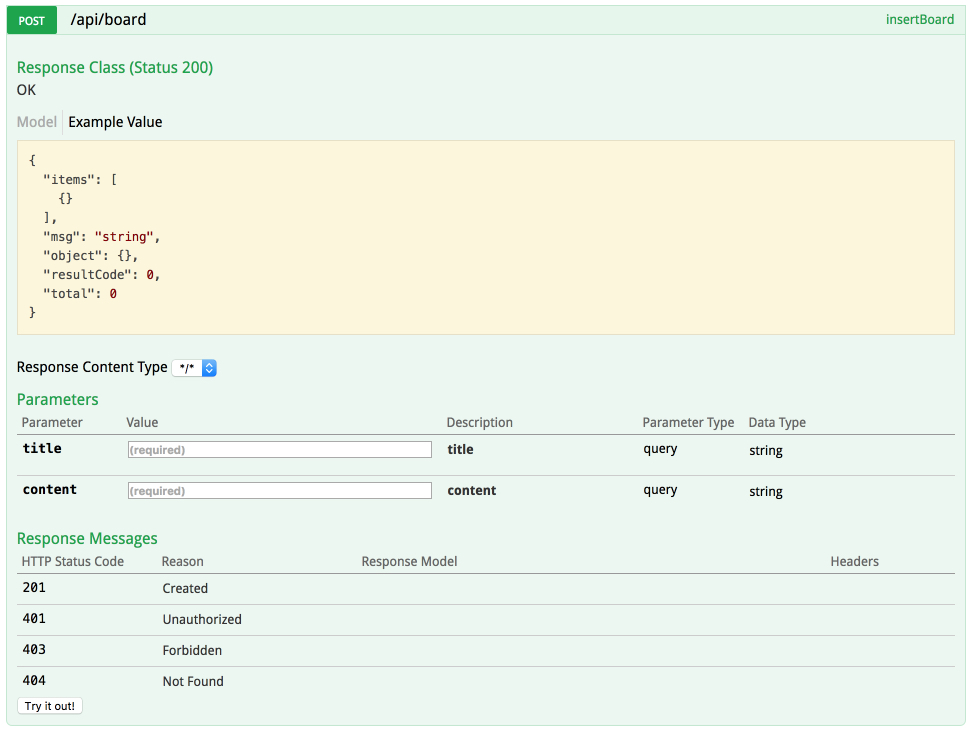
필수입력여부까지 아주 잘 작동된다. 그런데 좀 아쉬운 것이 있다. 파라미터에 대한 한글설명등을 넣어주고 싶거나 파라미터에 좀더 추가적인 설명을 달고 싶다. 그럴땐 어떻게 할까? 바로 Swagger에서 제공하는 Annotation를 사용하면 된다.
@ApiOperation(value = "해당 게시판 조회")
@ApiImplicitParams({
@ApiImplicitParam(name = "id", value = "게시판 고유키", required = true, dataType = "string", paramType = "path", defaultValue = ""),
})
@RequestMapping(value = "/board/{id}", method = RequestMethod.GET)
public ResultJson selectOneBoard(@PathVariable("id") Integer id) {
ResultJson resultJson = new ResultJson();
resultJson.setObject(boardService.selectOneBoard(id));
resultJson.setResultCode(ResultCodeType.SUCCESS.getCode());
resultJson.setMsg(ResultCodeType.SUCCESS.getMsg());
return resultJson;
}
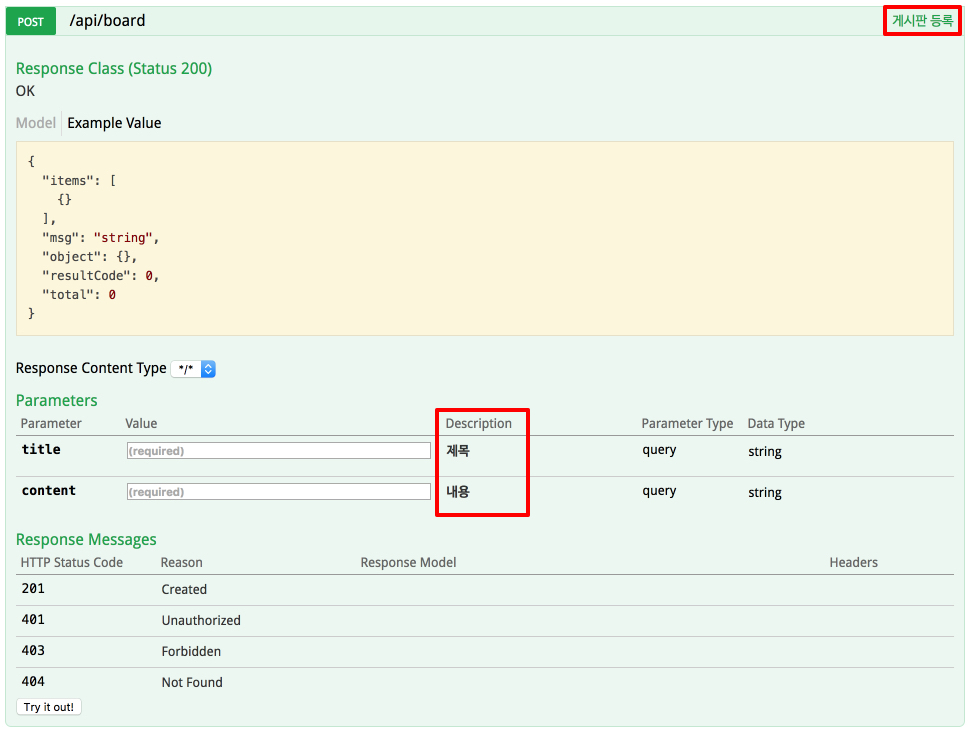
@ApiOperation(value = "게시판 등록")
@ApiImplicitParams({
@ApiImplicitParam(name = "title", value = "제목", required = true, dataType = "string", paramType = "query", defaultValue = ""),
@ApiImplicitParam(name = "content", value = "내용", required = true, dataType = "string", paramType = "query", defaultValue = ""),
})
@RequestMapping(value = "/board", method = RequestMethod.POST)
public ResultJson insertBoard(
@RequestParam(value = "title", required = true) String title,
@RequestParam(value = "content", required = true) String content){
ResultJson resultJson = new ResultJson();
BoardDto boardDto = new BoardDto();
boardDto.setTitle(title);
boardDto.setContent(content);
boardService.insertBoard(boardDto);
resultJson.setResultCode(ResultCodeType.SUCCESS.getCode());
resultJson.setMsg(ResultCodeType.SUCCESS.getMsg());
return resultJson;
}
@ApiOperation 에 메서드에 대한 설명을 적을 수 있다. 그리고 파라미터에 대한 설명은 @ApiImplicitParams안에 @ApiImplicitParam을 추가해서 만들 수 있다. 이때 @PathVariable 파리미터는 반드시 parameterType="path"로 설정하고 @RequestParam 파라미터는 parameterType="string"으로 설정해야 한다. 잘못되면 정상적으로 api가 작동하지 않는다.
그리고 가급적 순서도 맞게 정리하는 것이 좋다.
이렇게 Swagger에서 제공하는 어노테이션을 이용해서 설명까지 완벽하게 적용할 수 있다. 다만, 설명등을 수정하면 스프링을 재시작해야한다. 최종 적용된 아래 화면을 보자
이렇게 해서 앞으로 API가 수정되면 바로 적용되므로 API를 이용하는 개발자는 아주 쉽게 테스트하고 문서를 확인할 수 있게 된다. 이제 엑셀이나 워드로 API 문서를 만드는 것은 그만두자. ^^
전체소스는 아래에서 확인할 수 있다.