JPA에서 Collection 처리
JPA에서 @OneToMany <> @ManyToOne를 통해 양뱡향 처리하고 Collection으로 처리하는 방법을 알아본다. 아래와 같은 테이블 구조가 있다.
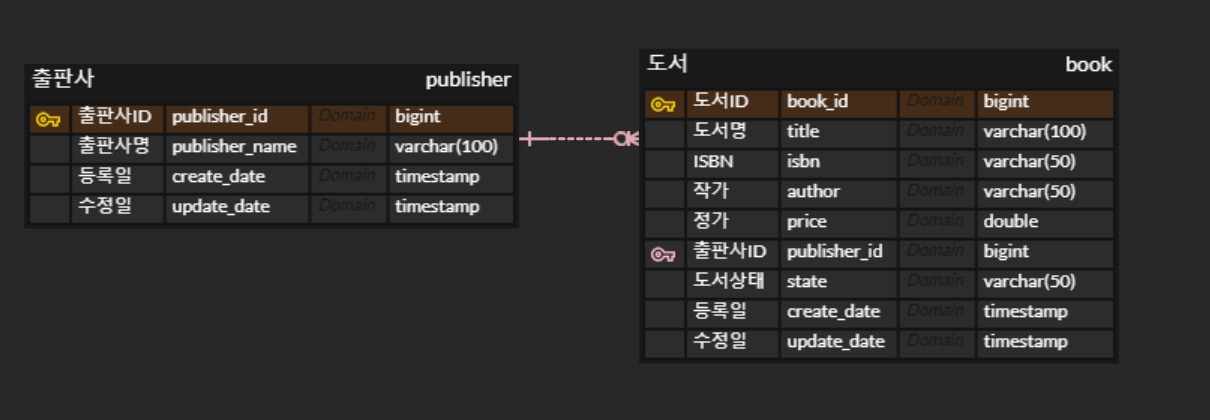
출판사(publisher)와 도서(book)은 일대다 <-> 다대일 관계로 앙뱡한 연관관게로 설정되어 있다.
출판사를 저정할 때 출판사가 발간한 책도 함께 저장해서 publsher, book 테이블이 각각 한번에 저장이 되어야 한다는 요구사항을 처리해보자.
아래와 같은 json 파라미터를 전달받고 이를 처리하는 것이다.
{
    "publisherName": "A출판사",
    "bookDtos": [
        {
            "title": "책1",
            "isbn": "11111",
            "author": "김작가",
            "price": 1000,
            "state": "SELL"
        },
        {
            "title": "책2",
            "isbn": "11112",
            "author": "박작가",
            "price": 1100,
            "state": "SELL"
        }
    ]
}
Publisher Entity
@Getter
@Builder
@Entity
@AllArgsConstructor
@NoArgsConstructor(access = AccessLevel.PROTECTED)
@Table(name = "publisher")
public class Publisher extends BaseEntity {
    @Id
    @GeneratedValue(strategy = GenerationType.IDENTITY)
    @Column(name = "publisher_id")
    private Long publisherId;

    @Column(name = "publisher_name", length = 100)
    private String publisherName;

    @OneToMany(mappedBy = "publisher", cascade = CascadeType.ALL, orphanRemoval = true, fetch = FetchType.LAZY)
    @Builder.Default
    private List<Book> books = new ArrayList<>();
}
Book Entity
@Getter
@Builder
@Entity
@AllArgsConstructor
@NoArgsConstructor(access = AccessLevel.PROTECTED)
@Table(name = "book")
@ToString
public class Book extends BaseEntity {
    @Id
    @GeneratedValue(strategy = GenerationType.IDENTITY)
    @Column(name = "book_id")
    private Long bookId;

    @Column(name = "title", length = 100)
    private String title;

    @Column(name = "isbn", length = 50)
    private String isbn;

    @Column(name = "author", length = 50)
    private String author;

    @Column(name = "price")
    private double price;

    @Column(name = "state")
    @Enumerated(EnumType.STRING)
    private State state;

    @ManyToOne(fetch = FetchType.LAZY)
    @JoinColumn(name = "publisher_id")
    private Publisher publisher;

}
@OneToOne 정보에서 cascade = CascadeType.ALL 옵션을 줌으로써 연관관계 영속성 전이가 생기도록 한다. 쉽게 말해서 Publiser에서 Book에 데이터를 추가하거나 삭제할 수 있도록 함을 말한다.
이 작업을 쉽게 해주는 편의메소드를 Publisher 엔티티에 추가한다.
    public void addBooks(List<BookDto> bookDtos) {
        bookDtos.forEach(bookDto -> {
            bookDto.setPublisher(this);
            books.add(bookDto.toEntity());
        });
    }
PublisherDto에 출판사 정보를 저장하고 하위 정보인 bookDto를 List로 받아 처리한다.
@Data
@Builder
@AllArgsConstructor
@NoArgsConstructor
public class PublisherDto {
    private Long publisherId;
    @NotBlank(message = "publisherName 필수입력")
    private String publisherName;

    @Builder.Default
    private List<BookDto> bookDtos = new ArrayList<>();

    public Publisher toEntity() {
        return Publisher.builder()
                .publisherName(publisherName)
                .build();
    }

    public static PublisherDto of(Publisher publisher) {
        return PublisherDto.builder()
                .publisherId(publisher.getPublisherId())
                .publisherName(publisher.getPublisherName())
                .bookDtos(publisher.getBookDtos())
                .build();
    }
}
Service 구현 부분은 아래와 같다.
@Service
@Transactional(readOnly = true)
@RequiredArgsConstructor
public class PublisherService {
    private final PublisherRepository publisherRepository;

    @Transactional
    public PublisherDto save(PublisherDto publisherDto) {
        Publisher publisher = publisherDto.toEntity();
        publisher.addBooks(publisherDto.getBookDtos());
        publisherRepository.save(publisher);
        return PublisherDto.of(publisher);
    }
}
PublisherDto를 Publisher 엔티티로 변경해서 그리고 나서 addBooks() 메소드를 이용해서 book 컬렉션에 저장을 한다.
그리고 최종으로 save메소드를 처리하면 insert publisher~ ,insert book ~ 등이 각각 처리된다. 위와 같이 작업하고 마지막에 엔티티를 Dto로 변환해주는 것을 리턴함으로써 최종 결과물을 표시해준다.
결과 Json
{
    "publisherId": 1,
    "publisherName": "A출판사",
    "bookDtos": [
        {
            "bookId": 1,
            "title": "책1",
            "isbn": "11111",
            "author": "김작가",
            "price": 1000.0,
            "state": "SELL",
            "publisherId": 1
        },
        {
            "bookId": 2,
            "title": "책2",
            "isbn": "11112",
            "author": "박작가",
            "price": 1100.0,
            "state": "SELL",
            "publisherId": 1
        }
    ]
}
그런데, 만약 서비스 구현 부분을 아래처럼 하면 어떻게 될까?
    @Transactional
    public PublisherDto save(PublisherDto publisherDto) {
        Publisher publisher = publisherRepository.save(publisherDto.toEntity());
        publisher.addBooks(publisherDto.getBookDtos());
        return PublisherDto.of(publisher);
    }
save메소드를 먼저 처리한 다음에 리턴되는 엔티티로 addBooks를 처리하는 것이다.
결과 json은 다음과 같다.
{
    "publisherId": 2,
    "publisherName": "A출판사",
    "bookDtos": [
        {
            "bookId": null,
            "title": "책1",
            "isbn": "11111",
            "author": "김작가",
            "price": 1000.0,
            "state": "SELL",
            "publisherId": 2
        },
        {
            "bookId": null,
            "title": "책2",
            "isbn": "11112",
            "author": "박작가",
            "price": 1100.0,
            "state": "SELL",
            "publisherId": 2
        }
    ]
}
다른 점을 발견했는가? bookId가 null로 리턴된다. 하지만 실제로 book테이블에는 bookId가 잘 반영되어 있다. JPA의 영속성 컨텍스트에 대한 이해도가 있다면 당연한 결과라 생각할 수 있다(알고나면 당연한건데 당시에는 왜 이렇게 나올까는 궁금했었다. 역시 공부는 실전이 병행되어야 한다)
save메소드가 먼저 실행되고 그후에 리턴되는 publisher 엔티티를 통해서 엔티티가 업데이트 되지만 해당 메소드가 끝나기 전까지는 실제 query가 실행되지 않기 때문에 bookId를 받지 못해서 null로 표시되는 것이다.
즉, jpa에서 제공하는 save등의 메소드를 수행하면 해당 쿼리가 실행되지만 단순히 entity의 값을 변경하면 transaction이 끝나기전까지는 실행되지 않기 때문에 null이 발생하는 것이다. 그래서 아래처럼 flush() 를 추가하면 쿼리가 정상 반영되어서 결과에서 확인이 가능하다.
    @Transactional
    public PublisherDto save(PublisherDto publisherDto) {
        Publisher publisher = publisherRepository.save(publisherDto.toEntity());
        publisher.addBooks(publisherDto.getBookDtos());
        publisherRepository.flush();
        return PublisherDto.of(publisher);
    }
다음은 수정할때의 요구사항이다. 출판사를 저장할때 책도 같이 저장되는데, 책이 줄어들때도 있고, 늘어날때도 있고 출판사명만 수정될 수도 있다. 따라서 각각 책에 대한 수정부분은 개별 체크가 어렵기 때문에 저장시 기존에 등록된 출판사의 책을 삭제하고 새로 입력해 준다. 물론 이럴 경우 책에 등록된 pk값이 증가되는 문제가 있기에 신중해야 한다. book에 pk값이 다른 값에 참조되어 있으면 절대 안된다.
JPA save()메소드를 이용해서 Insert, Update가 가능하지만, 모든 컬럼이 전체 업데이트 되는 문제도 있고(물론 @DynamicUpdate를 사용하면 되지만, 성능상의 문제가 있다고 한다) 그래서 그냥 해당 수정되는 컬럼만 업데이트 하자, 실제 출판사명만 변경될 것이다.
Pubisher 엔티티에 update 추가
    public void update(PublisherDto publisherDto) {
        publisherName = publisherDto.getPublisherName();
    }
이제 Serivce에서 Update를 처리해보자.
    @Transactional
    public PublisherDto update(PublisherDto publisherDto) {
        Publisher publisher = publisherRepository
                .findById(publisherDto.getPublisherId())
                .orElseThrow(() -> new IllegalArgumentException("유효하지 않은 ID"));
        publisher.getBooks().clear();
        publisher.addBooks(publisherDto.getBookDtos());
        publisher.update(publisherDto);
        publisherRepository.flush();
        return PublisherDto.of(publisher);
    }
publisher.getBooks().clear()를 통해 기존에 등록된 해당 book 데이터를 삭제하고, 그리고 나서 다시 등록하고, 최종으로 update처리하고 save등을 사용안했기에 flush등을 처리해서 리턴되는 결과에서 바로 확인하도록 해준다.
삭제시에는 더 간단하다.
    @Transactional
    public void delete(Long publisherId) {
        Publisher publisher = publisherRepository
                .findById(publisherId)
                .orElseThrow(() -> new IllegalArgumentException("유효하지 않은 ID"));
        publisherRepository.delete(publisher);
    }
cascade = CascadeType.ALL 이 설정되어 있어서 부모엔티티가 삭제되면 연관된 엔티티도 같이 삭제가 된다.
이렇게 양방향연관관계를 맺고, 편의메소드를 통해서
cascade = CascadeType.ALL, orphanRemoval = true 을 설정해주면 편리하게 연관된 엔티티도 자바 컬렌셕을 통해서 손쉽게 처리가 가능하다. 만약 mybatis 였으면 수많은 쿼리매퍼작업을 했을 것이다. 하지만 본문에도 경고했듯이, 연관된 데이터를 삭제시에는 다른 엔티티(테이블)과 연관관계가 없어야 한다
실제 실무에서 위와 비슷한 요구사항이 발생해서 위 방식으로 잘 처리되어서 블로그에 공유를 하고자 한다.
전체 소스는 아래에서 참고 가능하고, 추후에 계속 해당 소스는 업데이트 될 예정이다.